
Home Improvement
Why a Professional Snagging Survey is Essential for Your New-Build Home
Buying a new-build property is one of the most significant financial commitments you will ever make. It is a moment defined by the expectation of perfection, polished finishes, and a home that is ready for a lifetime of memories. However, the modern construction industry operates under intense pressure, often involving tight deadlines and high volumes of units. This environment can lead to overlooked defects, rushed finishing, and structural inconsistencies that the untrained eye might miss. To ensure your investment is truly protected, investing in professional snagging services is no longer just a luxury. It is a critical necessity for any savvy homeowner.
Understanding the True Role of a Snagging Survey
A snagging survey is much more than a simple walkthrough. It is a comprehensive, independent inspection of a newly built property specifically designed to identify defects or “snags” that the developer or site manager has missed. These issues can range from minor cosmetic flaws like chipped paint, scratched glass, or uneven tiling to significant structural problems such as breaches in fire cavity barriers, poorly installed drainage, or inadequate insulation.
While most developers conduct their own internal quality checks, an independent surveyor works exclusively for you, the buyer. They provide an unbiased, third-party assessment to ensure the property meets the strict standards you were promised before you legally complete the purchase or move your furniture in.
The Technical Advantage of Expert Snagging Services
Many homeowners mistakenly believe they can snag the house themselves by spending a few hours looking at the walls and testing the taps. However, a professional inspector brings decades of industry experience and specialised equipment that the average buyer simply does not possess. They understand the anatomy of a building and know exactly where common failures occur.
Modern snagging services utilise advanced technology like thermal imaging cameras. These tools allow surveyors to detect cold bridging, damp spots, or missing insulation behind plastered walls that remain completely invisible to the naked eye. An expert will also check for compliance with the latest safety and performance regulations.
The Benefit of Pre-Completion Inspections (PCI)
One of the most powerful tools available to a modern homebuyer is the Pre-Completion Inspection. Under current industry guidelines, you have the right to have your home inspected before you even take legal possession. This provides immense leverage because the developer is highly motivated to rectify issues while their tradespeople are still active on-site.
Documenting these issues in a detailed photographic report at this stage allows you to demand repairs before you even pick up the keys. This saves you from the immense stress of living in a construction zone after your moving day, where dusty repairs and constant contractor visits can ruin the excitement of your new home.
Identifying Hidden Thermal and Insulation Failures
Energy efficiency is a primary reason people choose new-build homes. However, if the insulation is poorly installed or gaps are left in the building fabric, you will not see the promised savings on your utility bills. Professional inspectors look for these “invisible” flaws that a standard visual check would never catch.
By using thermal technology, a surveyor can see exactly where heat is escaping. This ensures that your home is as energy-efficient as the developer claimed and prevents future issues with cold spots or condensation that can lead to mould growth over time.
Ensuring Compliance with Fire Safety Regulations
Safety is the most critical aspect of any home inspection. Specialist surveyors pay close attention to fire safety measures, such as the correct installation of fire stops and cavity barriers within the walls and loft space. These components are vital for preventing the spread of fire between rooms or properties.
Because these elements are usually hidden behind plasterboard or in difficult-to-reach areas, they are frequently installed incorrectly or omitted entirely during a rushed build. A professional survey provides the peace of mind that your family is living in a home that is built to the highest safety standards.
Navigating the Relationship with Your Developer
One of the most overlooked benefits of a professional survey is the professional weight it carries. When a homeowner complains about a squeaky floorboard, a developer might dismiss it as “settling.” However, when a qualified surveyor cites a specific building regulation or technical failure in a formal report, the developer is much more likely to take immediate action.
A high-quality report acts as a clear roadmap for the site manager. By providing clear evidence and technical descriptions of every fault, you remove any ambiguity and speed up the rectification process. This professional approach helps maintain a constructive relationship with the builder by focusing on facts rather than emotions.
Protecting the Future Resale Value of Your Property
The period following a move is notoriously stressful, and the last thing a homeowner wants is a years-long battle with a developer over hidden defects discovered months down the line. A professional snagging survey covers every inch of the property, from the integrity of the external brickwork and guttering to the internal functionality of plumbing, electrics, and joinery.
By identifying these faults early, you also protect the future resale value of the property. When you eventually come to sell the house, having a record that the initial build quality was verified and corrected can be a strong selling point for future buyers. It proves that the home has been maintained to a high standard from day one.
Conclusion
Your new home should represent a fresh start, not a growing list of DIY projects and repair bills. By engaging professional snagging services, you are taking control of the quality of your environment. You are ensuring that the home you pay for is the home you actually receive.
In the context of a property purchase costing hundreds of thousands of pounds, the cost of an expert inspection is a small price to pay for total peace of mind and long-term financial security. Do not leave the quality of your new-build property to chance. Ensure your builder is held to account with a detailed, independent snagging survey that protects your family, your finances, and your future.

A comfortable kitchen is about more than attractive cabinets and modern appliances. One of the most important yet often overlooked aspects of kitchen design is ventilation. Every time food is cooked, steam, smoke, grease particles, and odors are released into the air. Without proper ventilation, these elements can linger in the kitchen and spread throughout the home, affecting both comfort and indoor air quality.
As modern homes continue to embrace open-plan layouts and multifunctional living spaces, effective ventilation has become increasingly important. Homeowners are paying closer attention to solutions that help maintain a clean and pleasant cooking environment while complementing the overall design of the kitchen. Understanding the available ventilation options can help homeowners make informed decisions that suit their specific needs and living situations.
Common Types of Kitchen Ventilation Systems
Kitchen ventilation systems generally fall into two main categories: ducted systems and recirculating systems. Each option offers unique advantages depending on the layout of the home and the homeowner’s preferences.
Ducted Ventilation Systems
Ducted ventilation systems remove cooking fumes, smoke, and odors by extracting air from the kitchen and directing it outside through ductwork. These systems are often considered highly effective because they physically remove airborne particles from the home rather than filtering and recirculating them.
Many homeowners prefer ducted systems when building new homes or undertaking major kitchen renovations. Since the air is expelled outdoors, these systems can help maintain excellent indoor air quality. However, installation may require additional planning, particularly if ductwork needs to be routed through walls or ceilings.
Recirculating Ventilation Systems
Recirculating systems operate differently. Instead of venting air outside, they pass air through specialized filters before releasing it back into the kitchen. These systems are often chosen when external ducting is not practical or possible.
Because they do not require extensive structural modifications, recirculating systems can be easier to install and may offer greater flexibility for certain kitchen layouts. This makes them a popular choice in apartments, rental properties, and homes where adding external ventilation would be difficult.
Why Homeowners Are Looking for Flexible Ventilation Solutions
Modern housing trends have created a growing demand for ventilation systems that can adapt to different living environments. Many people now live in apartments, condominiums, and urban homes where traditional ducted installations may present challenges.
Renovation projects can also influence ventilation choices. Homeowners often seek solutions that provide effective performance without requiring extensive construction work. Flexible systems help simplify upgrades while minimizing disruption to existing layouts.
Space considerations play a role as well. Contemporary kitchens are frequently designed to maximize available room while maintaining a clean and streamlined appearance. Ventilation systems that fit comfortably within these designs are becoming increasingly attractive.
As lifestyles continue to evolve, homeowners are looking for practical solutions that balance performance, convenience, and compatibility with modern living spaces.
How Recirculating Ventilation Technology Works
Recirculating ventilation systems rely on a filtration process to improve kitchen air quality. When cooking fumes, steam, and odors are generated, the system draws the air through filters designed to capture grease particles and other contaminants.
One of the key components of this process is the carbon filter. These filters help absorb cooking odors before the cleaned air is released back into the room. This approach allows homeowners to enjoy improved air quality without requiring external ductwork.
A recirculating cooker hood can be a practical option for homeowners who want effective ventilation without the need for external ductwork.
These systems are particularly useful in kitchens where structural limitations make traditional venting difficult. While regular filter maintenance is necessary to maintain performance, many homeowners appreciate the convenience and flexibility that recirculating technology provides.
As filtration technology continues to improve, modern recirculating systems are becoming increasingly effective at supporting comfortable and pleasant cooking environments.
Key Benefits of Modern Ventilation Systems
Kitchen ventilation systems offer several important benefits that contribute to a better overall cooking experience.
Improved Air Quality
Ventilation systems help remove airborne particles produced during cooking. This can contribute to a fresher indoor environment and reduce the accumulation of unwanted pollutants.
Reduced Cooking Odors
Strong cooking smells can linger long after meals have been prepared. Effective ventilation helps manage these odors, making kitchens and adjoining living spaces more comfortable.
Better Kitchen Comfort
Cooking often generates heat and moisture. Ventilation systems help reduce excess humidity and improve airflow, creating a more pleasant atmosphere during meal preparation.
Cleaner Cooking Environment
By helping remove grease particles from the air, ventilation systems can reduce buildup on cabinets, walls, and other kitchen surfaces. This can simplify cleaning and support long-term maintenance efforts.
What to Consider Before Choosing a Cooker Hood
Selecting the right cooker hood requires evaluating several factors related to both performance and lifestyle needs.
Kitchen size is an important consideration because larger spaces may require more powerful ventilation systems to maintain effective airflow. Homeowners should also think about how often they cook and the types of meals they prepare. Frequent cooking or high-heat methods may generate more smoke and odors, increasing ventilation requirements.
Maintenance is another important factor. Recirculating systems typically require periodic filter replacement to maintain optimal performance. Understanding these maintenance needs can help homeowners choose a system that fits their preferences.
Noise levels should also be considered, particularly in open-plan homes where kitchen sounds may be more noticeable. Many homeowners compare solutions from manufacturers such as Ciarra One when evaluating ventilation options for different kitchen layouts.
By considering these factors carefully, homeowners can select a cooker hood that supports both comfort and practicality.
Kitchen Trends Influencing Ventilation Choices
Several design trends are shaping the way homeowners approach kitchen ventilation. Open-plan living continues to be one of the most significant influences. Because kitchens are now more closely connected to dining and living areas, effective ventilation has become increasingly important.
Minimalist design trends have also encouraged demand for sleek and unobtrusive ventilation systems that blend naturally into contemporary interiors. Homeowners want products that perform well while supporting the overall aesthetic of the space.
Energy efficiency is another growing priority. Consumers are paying closer attention to appliance performance and long-term operating costs, leading manufacturers to develop more efficient ventilation technologies.
The rise of smart home technology is also influencing appliance selection. As connected features become more common, ventilation systems may continue evolving to offer greater convenience and customization.
Conclusion
Kitchen ventilation plays a vital role in maintaining comfort, cleanliness, and indoor air quality. Whether choosing a ducted system or a recirculating solution, homeowners have access to a variety of options designed to suit different kitchen layouts and lifestyle requirements.
Understanding how ventilation systems work can help homeowners make informed decisions that support both functionality and design goals. By considering factors such as kitchen size, cooking habits, maintenance needs, and overall layout, it becomes easier to select a solution that enhances the cooking experience while contributing to a more comfortable home environment.
Home Improvement
How the State of Your Home Affects Your Mental Space — More Than Most People Account For
There’s a version of this that sounds like an exaggeration until you’ve actually experienced the difference. A home that’s consistently clean and organized produces a different quality of daily experience than one that’s perpetually behind on cleaning — not dramatically, not in ways that generate a specific complaint, but in the low-level way of background friction that accumulates over time.
The research on this is more robust than most people realize. Studies consistently show that cluttered and dirty environments elevate cortisol levels — the stress hormone — and that the mental load of living in a space that needs attention is real even when it’s operating below the level of conscious awareness. People describe their homes as something they manage rather than something they relax in. The weekend that should feel like recovery starts with a cleaning task that takes most of the morning and leaves the rest of the day feeling compressed.
This isn’t an argument for perfectionism about home cleanliness. It’s an observation that the standard a home is maintained at affects the quality of time spent in it — and that the decision to hire residential cleaning services is often less about the cleaning itself than about removing a persistent source of background stress from an already full life. Badger Luxe Cleaning provides residential cleaning services for homes in the Green Bay and Madison areas, with the consistency and reliability that makes the difference between a service that solves the problem and one that adds a different kind of management overhead. Before getting into what that looks like, it’s worth understanding why residential cleaning is a specific category with its own requirements.
What Makes Residential Cleaning Different From Other Cleaning Contexts
Residential cleaning happens in a private space where the standards are personal and the relationship between the cleaner and the household is ongoing. This is different from commercial cleaning in ways that affect what good service looks like.
The personal dimension means that preferences matter in ways they don’t in a commercial context. A household that prefers certain products avoided for allergy or sensitivity reasons, that has specific priorities around particular areas of the home, that wants consistent attention to details that matter to them specifically — these preferences need to be understood and maintained across visits, not re-explained every time. A residential cleaning service that treats every visit as a new engagement rather than a continuation of an established relationship produces results that feel generic rather than tailored to the household.
The ongoing relationship dimension means that trust is part of what’s being established. A cleaning team has access to a private home — to spaces, belongings, and the normal evidence of daily life that most households don’t expose to strangers. The professional conduct, discretion, and reliability of the cleaning team are not secondary considerations in a residential context. They’re central to whether the relationship feels comfortable enough to maintain long-term.
Consistency in staffing is more important in residential cleaning than in almost any other service category because of this relationship dimension. When the same people clean a home regularly, they develop familiarity with the space, with the household’s preferences, and with the standard that’s been established over time. When the crew changes frequently, that accumulated familiarity disappears with it — and the household is back to a clean that feels like a stranger’s interpretation of what their home should look like rather than a continuation of the standard they’ve built.
What Wisconsin Homes Specifically Require
Residential cleaning in Wisconsin has a seasonal dimension that affects what a cleaning service needs to address differently across the year. The months from November through March produce a specific accumulation pattern that doesn’t exist the rest of the year — tracked-in salt, slush, and wet debris that works on floors, rugs, and entryway surfaces at a rate that summer cleaning schedules don’t account for.
Entryways bear the heaviest burden of this seasonal accumulation. Salt residue damages hard flooring surfaces and stains carpets when it’s allowed to accumulate rather than being cleaned frequently enough to prevent it from working into the material. A residential cleaning service that adjusts its attention to entryways, mudrooms, and high-traffic floor areas during winter months maintains a consistent standard across the year. One that applies the same approach in January as in July produces results that are adequate eight months of the year and visibly insufficient for the other four.
Wisconsin homes also tend to be used differently across seasons in ways that affect which areas accumulate most. Summer brings more outdoor-indoor traffic, more open windows that bring in pollen and dust, and more use of outdoor-adjacent spaces. Winter concentrates household activity indoors in ways that load different areas. A residential cleaning schedule that reflects how the home is actually used through the year produces better results than a uniform approach applied regardless of season.
Badger Luxe Cleaning provides residential cleaning services in the Green Bay and Madison areas with consistent staffing, defined scope, and an approach that accounts for the specific conditions of Wisconsin homes across the full year. For households that are evaluating residential cleaning options and want a service that maintains a real standard rather than one that requires ongoing supervision to keep on track, that combination is what makes the difference between a service worth keeping and one worth replacing.
According to the U.S. Bureau of Labor Statistics’ American Time Use Survey, 2024, watching television remains the single most common leisure activity in American households, with adults averaging two hours and 36 minutes of viewing per day. That’s a meaningful amount of time to spend in a space that hasn’t been set up to make the most of it.
A room designed specifically for watching, with the right screen, sound, seating, and atmosphere, turns that daily habit into something worth looking forward to, and something guests tend to remember long after the evening ends.
Strong home movie room ideas don’t require a blank-check renovation budget or a room the size of a commercial screening hall. What they require is a clear concept, a smart layout, and a few well-made decisions. These five ideas cover a range of spaces, styles, and investment levels, and each one is genuinely achievable.
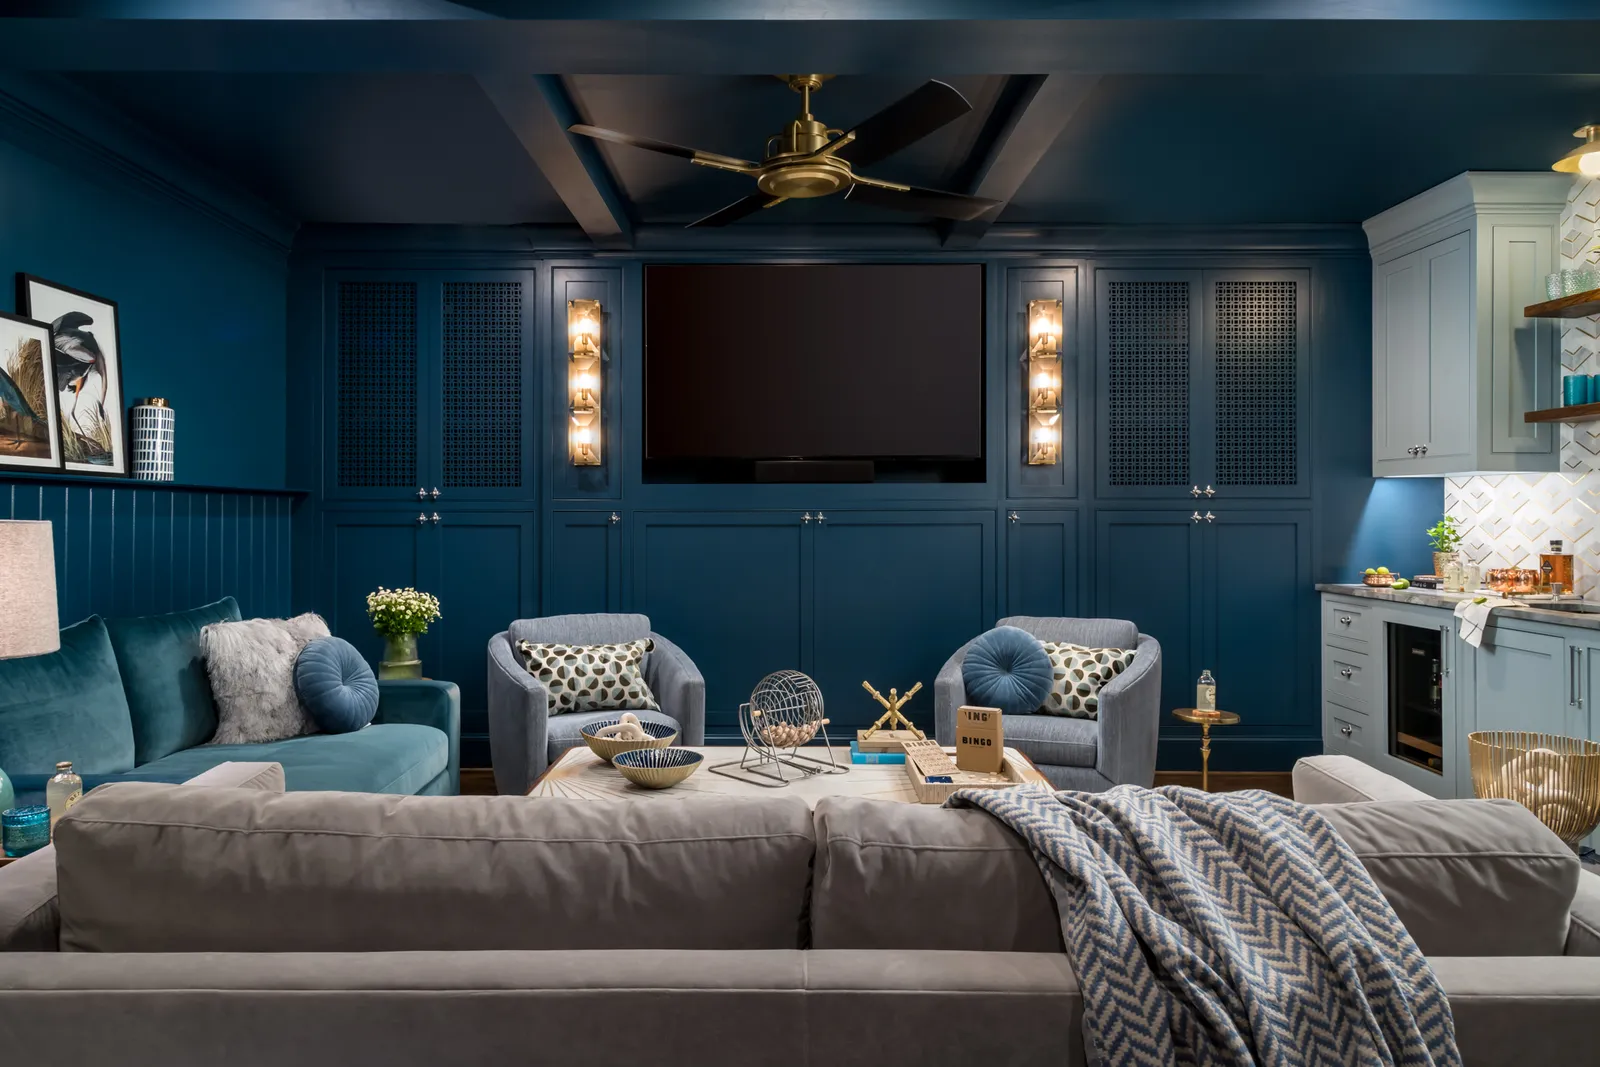
What Makes a Movie Room Feel Like a Destination, Not Just a Room with a TV
The difference between a room that impresses guests and one that doesn’t comes down to whether the space was designed with a purpose or just furnished with equipment. A movie room that wows tends to get three things right: the display and sound work together, the seating is comfortable enough for a full film, and the atmosphere, through lighting, materials, and layout, reinforces the sense that this room is built for watching.
Theater seating for home use has improved significantly in recent years. Choosing seating built specifically for long viewing sessions rather than repurposing a living room sofa is one of the highest-impact upgrades available at any budget level. With that foundation in place, these five home movie room ideas show what great execution looks like across different room types and design directions.
Five Home Movie Room Ideas for Every Space, Style, and Budget
Each of the following ideas works as a complete concept you can take from a blank room to a finished space. Some suit a spare bedroom, others a full basement or dedicated room. The one that fits best depends on the space available and how the room will be used day to day.
Idea 1: The Compact Dark Room
A small, enclosed room such as a spare bedroom or a converted home office is often the best starting point for a movie room. Its compact size works in its favor: less volume to fill with sound, easier light control, and a more intimate atmosphere that larger rooms struggle to replicate.
The display choice in a compact room leans toward a large flat-screen TV in the 65 to 75-inch range. Throw distance is limited, and wall reflections in a tight space can reduce projector image quality. A good OLED panel produces exceptional contrast in a dark room and requires no calibration or alignment.
Key features of an effective compact setup:
- Full blackout on all windows using roller blinds or lined curtains; any light bleed in a small room is immediately obvious during dark scenes
- A single recliner row or compact loveseat positioned at roughly 1.5 times the screen’s diagonal measurement from the display
- Bias lighting behind the screen on a dimmable circuit, which reduces eye strain and makes the image appear richer without adding ambient glow to the room
Idea 2: The Basement Cinema Conversion
A basement offers everything a good movie room needs by default: separation from the rest of the house, concrete construction that contains sound, and natural darkness that makes projection viable without major light management work.
A 4K laser projector paired with a 100 to 110-inch fixed-frame screen delivers a genuinely cinematic result, and a basement is one of the best environments to get the most out of it. The projector should be ceiling-mounted centrally to the screen, and the screen center should sit at roughly seated eye level for the front row.
The step-by-step approach to a well-functioning basement movie room:
- Address the acoustics first. Lay carpet or a thick area rug across the full floor and add fabric panels or heavy curtains on at least two walls before any equipment goes in.
- Run all cabling before furniture goes in. HDMI, speaker, and power cables should be routed through walls or under flooring while the room is still empty.
- Mount the screen or display before finalizing the seating position. The viewing angle to the screen center determines ideal row placement, which needs to be confirmed with the display in its final position.
- Install bias lighting and scene control. A smart lighting system with two or three presets transforms how the room operates day to day.
- Add seating last, once all measurements are confirmed. Recliners need specific floor clearance at full extension, so placement should only be finalized after everything else is in position.
Idea 3: The Dedicated High-End Theater Room
A fully dedicated theater room is the most considered of all home movie room ideas, and the one guests tend to remember longest. Every decision, from the ceiling treatment to the seat fabric, is made in service of a single purpose.
The visual reference for premium dedicated rooms has shifted toward boutique cinema interiors: dark, moody palettes, deep-pile carpet across the full floor, timber millwork around the screen surround, and deliberate accent lighting that sets the space apart from anywhere else in the home.
Features that define a standout dedicated theater room:
- In-wall or in-ceiling speakers flush-mounted so no visible hardware appears in the room during viewing
- Two tiered rows of purpose-built recliners, with the rear row elevated 12 to 16 inches on a timber riser platform for clean sightlines
- Acoustic panel treatment at primary reflection points, chosen in a fabric and color that works within the room’s overall palette
Idea 4: The Multipurpose Media Lounge
Not every home has space for a fully dedicated theater, and a multipurpose media room that serves as a lounge, games room, and screening space throughout the week is a genuinely strong alternative. The design challenge is building a room that functions well in each mode without seriously compromising any of them.
Flexible furniture is the key. A combination of theater-grade recliners in the primary viewing position and a secondary lounge area with a sofa or ottomans gives the room enough range to shift between a casual gathering space and a proper screening setup. Lighting on multiple independent circuits handles the transition between modes cleanly, and a motorized or retractable screen keeps the room from feeling like a theater when it’s being used for something else.
Idea 5: The Relaxed Social Cinema
For homes with a larger open space, or where a more relaxed and informal atmosphere suits the household better, a social cinema concept works well and tends to feel genuinely distinctive to guests.
Large-format projection onto a painted feature wall, low-profile seating such as oversized floor cushions, modular poufs, or a curved sectional sofa arranged in a loose arc, warm pendant lighting, and a sound system integrated without visible speakers: the atmosphere is social and inviting rather than formal. This is a particularly good match for households that host mixed groups where some guests prefer a more casual setting over a structured theater row.
How to Compare the Five Ideas Before Committing to One
Choosing between these movie room ideas for home comes down to three things: room size, primary use, and budget. The table below maps each idea to those variables at a glance.
| Idea | Ideal Room Size | Primary Use | Approx. Budget Range |
| Compact Dark Room | Under 150 sq ft | Daily personal viewing | $3,000–$8,000 |
| Basement Cinema Conversion | 150–300 sq ft | Dedicated family or group viewing | $8,000–$20,000 |
| Dedicated High-End Theater | 200 sq ft or more | Serious cinephile or entertaining | $25,000–$60,000+ |
| Multipurpose Media Lounge | 180–350 sq ft | Mixed daily use and screening | $6,000–$18,000 |
| Relaxed Social Cinema | 250 sq ft or more | Social gatherings and group viewing | $5,000–$15,000 |
Where to Start When Turning a Room into a Home Cinema Worth Showing Off
The most useful first step in any of these movie room ideas for home is settling on the primary use case before choosing any equipment. A room that hosts ten guests monthly has different requirements than one used daily by two or three people. Getting that clarity early keeps the budget focused and avoids the most common home theater mistake: spending heavily on the display while underinvesting in sound, seating, and the acoustic character of the room.
A home movie room that impresses guests is one where every element was chosen for the experience it produces. That’s the standard worth building toward.
FAQ
Does a home movie room need acoustic treatment to sound good?
Not necessarily, but the room will perform noticeably better with at least basic treatment in place. A thick rug across the floor, heavy curtains on the walls, and upholstered seating collectively absorb the mid-range reflections that make dialogue unclear and action sequences sound muddy. Full acoustic panel treatment at primary reflection points is worth adding once the room is in regular use and the difference becomes easier to hear.
Can a multipurpose room work as both a home office and a movie room?
Yes, with the right layout and display choice. A large flat-screen TV on a swivel mount or a motorized screen that retracts when not in use allows the room to shift between uses without one function dominating the other. Lighting on separate circuits with scene presets makes the transition between work mode and viewing mode straightforward.
What ceiling height is needed for a two-row tiered home theater?
A two-row tiered setup with a 12 to 16-inch riser for the rear row typically requires a minimum ceiling height of 9 feet to maintain comfortable headroom in both rows. An 8-foot ceiling can work with a lower riser of 8 to 10 inches, but the reduced elevation means sightlines are tighter and front-row headrests become more of a visibility concern.
Is a projector or a TV better for a home movie room used during the day?
A flat-screen TV is the more practical choice for rooms that get regular natural light. Even good blackout curtains don’t eliminate all ambient light in a daytime setting, and projectors lose contrast in even low-level light. A modern QLED or OLED TV in the 75 to 85-inch range performs well across all lighting conditions and requires no setup adjustment. A projector becomes the stronger option in rooms that can be fully darkened.
Can a movie room add resale value to a home?
A well-executed media room can increase perceived value and make a listing stand out. Dedicated theaters appeal to a narrower buyer pool; multipurpose media rooms tend to resonate more broadly. Listing the space as a “media room” or “bonus room” typically keeps buyer interest wider.


Sophia Grace and Rosie: Complete Biography, Career Journey, Family, Fame & Life After Viral Stardom

Usha Vance Net Worth: Career, Salary, Education, Family & Financial Success
The art of packing fragile and high-value items when you move house

Carolin Bacic: Life, Biography, Family, and Legacy

Christine Williamson: A Rising Star in Sports Journalism

Dani Daniels: A Complete Biography of the Artist, Media Personality, and Entrepreneur
-
 Celebrity10 months ago
Carolin Bacic: Life, Biography, Family, and Legacy
-
 Celebrity1 year ago
Christine Williamson: A Rising Star in Sports Journalism
-
 Celebrity9 months ago
Dani Daniels: A Complete Biography of the Artist, Media Personality, and Entrepreneur
-

 Celebrity3 months ago
Valerie Perrine: A Complete Biography of the Acclaimed Actress and Icon
-

 Celebrity1 year ago
Vera Davich: Biography, Life, and Legacy2025
-

 Celebrity3 months ago
Alex Eala: Rising Tennis Star from the Philippines and Her Journey to Global Success
-

 Celebrity7 months ago
Eleonora Incardona: Biography, Career, Age, Boyfriend, Net Worth & Lifestyle (2025)
-

 Celebrity5 months ago
Dame Esther Rantzen: Life, Career, and Legacy of a British Broadcasting Icon