
Uncategorized
Mick Fleetwood Height, Life, and Legacy: A Detailed Biography

Mick Fleetwood, the legendary drummer of Fleetwood Mac, is one of the most recognized figures in the history of rock music. Aside from his incredible drumming skills and iconic stage presence, many fans have often wondered about Mick Fleetwood’s height, since his towering figure makes him stand out on and off stage. In this biography, we will explore not only his height but also his early life, music career, personal journey, and legacy.
Mick Fleetwood Height: The Basics
When discussing Mick Fleetwood height, it’s impossible not to be impressed. Standing at an astonishing 6 feet 6 inches (198 cm), Fleetwood is significantly taller than the average man, and his stature has often been a talking point among fans and fellow musicians. His tall frame added to his commanding stage presence, making him one of the most visually striking drummers in the world.
Early Life of Mick Fleetwood
Born on June 24, 1947, in Redruth, Cornwall, England, Michael John Kells Fleetwood grew up in a family that encouraged creativity. His father, a Royal Air Force pilot, and his mother moved frequently due to military duties, exposing Mick to different cultures. Despite struggling academically, Mick found passion in music and drumming, which would shape his future. His height also developed early, making him stand out as a child.
Mick Fleetwood Height in Childhood and Adolescence
Fleetwood’s remarkable height became noticeable during his teenage years. By the age of 15, he was already well above six feet tall, towering over his classmates. While some found it awkward, Mick embraced his physique, often joking about how it helped him become more visible on stage. His tall frame also gave him a unique advantage when playing the drums, as he could easily command large drum kits.
The Formation of Fleetwood Mac
In 1967, Fleetwood, along with Peter Green and John McVie, formed Fleetwood Mac. The band quickly gained recognition in the British blues scene. Mick’s height and distinctive appearance made him instantly recognizable, often serving as the band’s visual anchor. His drumming style, combined with his imposing figure, contributed to the band’s reputation as an electrifying live act.

Mick Fleetwood Height and Stage Presence
On stage, Mick’s 6’6” stature gave him an undeniable presence. Unlike many drummers who remain in the background, Fleetwood became a visual and emotional centerpiece of Fleetwood Mac performances. His wild energy, tall frame, and iconic expressions made fans focus on him as much as the lead singers. His height made his movements exaggerated, amplifying the drama of each performance.
Comparison with Other Rock Legends
In the world of rock, Mick Fleetwood height stands out even among legends. For example, Robert Plant (Led Zeppelin) is 6’1”, David Bowie was 5’10”, and Mick Jagger stands at 5’10”. Compared to them, Fleetwood was a giant. His towering presence made him one of the tallest iconic figures in rock, further cementing his unique image in the music world.

Personal Life and Relationships
Beyond his career, Mick’s personal life has also drawn attention. He was married multiple times and has four children. His relationships, though sometimes tumultuous, reflect his emotional and passionate personality. Many have noted that his height and charismatic appearance contributed to his commanding aura in personal and professional circles alike.
Mick Fleetwood’s Fashion and Image
Fleetwood’s height also influenced his style. Known for wearing flowing outfits, oversized vests, and iconic stage costumes, he always tailored his look to his tall frame. His eccentric fashion sense was not just an expression of personality but also a way to complement his towering figure. Fleetwood’s memorable red shoes and vests became trademarks of his flamboyant stage identity.
Height as an Advantage in Drumming
Being tall gave Mick Fleetwood unique advantages as a drummer. His long arms allowed him to cover expansive drum kits effortlessly, giving him flexibility and power. His height also contributed to the physical energy he displayed, with exaggerated movements and dramatic flourishes. These traits helped him create a drumming style that was both musically powerful and visually captivating.
Fleetwood Mac’s Global Success
With albums like “Rumours” (1977) and “Tusk” (1979), Fleetwood Mac achieved worldwide fame. During this era, Fleetwood’s height and presence became synonymous with the band’s image. Standing tall behind his drums, he became a symbol of resilience and unity, especially during the band’s internal struggles and personal dramas.
Mick Fleetwood Height and Media Appearances
Mick’s height often became a topic of discussion in interviews and media features. Journalists and fans frequently commented on how he would tower over other band members during photo shoots. His commanding presence was sometimes described as “statuesque,” adding to his rock star mystique.
Comparisons with Celebrities Outside of Music
Beyond the music world, Mick Fleetwood’s height has been compared to actors and athletes. For example, he is taller than Liam Neeson (6’4”), Dwayne Johnson (6’5”), and most NBA players. This comparison highlights how unusual his height is in the entertainment industry, where most musicians are of average build.
Mick Fleetwood’s Ventures Beyond Music
In addition to Fleetwood Mac, Mick pursued other ventures, including acting, writing, and entrepreneurship. His height often made him a natural choice for roles requiring an imposing figure. He also opened restaurants, wrote memoirs, and collaborated with other artists, always bringing his distinctive personality and presence into his projects.
Health and Lifestyle
Tall individuals sometimes face unique health challenges, and Mick Fleetwood has openly spoken about maintaining a healthy lifestyle to support his drumming career. At his 6’6” height, posture and stamina are vital. Fleetwood has managed to stay active for decades, proving that his towering frame has been a strength rather than a limitation.
Mick Fleetwood Height in Popular Culture
Fans often reference Mick Fleetwood’s height in forums, biographies, and documentaries. His tall figure has even inspired caricatures, album artwork discussions, and fan art. His presence has become an inseparable part of his identity in popular culture, making “Mick Fleetwood height” a frequently searched term online.
Legacy of Mick Fleetwood
Mick Fleetwood’s legacy goes beyond his music. His height, personality, and artistry combined to create one of rock’s most memorable personas. As a founding member of Fleetwood Mac, he not only contributed musically but also visually and symbolically. Today, his towering presence continues to fascinate fans around the world.
Conclusion
In summary, Mick Fleetwood’s height is more than just a number — it’s a defining feature of his persona as one of rock’s greatest drummers. Standing 6’6” tall, he became a commanding presence in Fleetwood Mac and in the world of music at large. His stature, combined with talent and charisma, ensured his place in music history. Whether behind the drums or in front of the media, Fleetwood’s height remains part of his enduring legend.
FAQs About Mick Fleetwood Height
Q1. How tall is Mick Fleetwood?
Mick Fleetwood stands at 6 feet 6 inches (198 cm) tall.
Q2. Is Mick Fleetwood the tallest member of Fleetwood Mac?
Yes, Mick Fleetwood is significantly taller than all other members of the band.
Q3. Did Mick Fleetwood’s height affect his drumming?
Yes, his tall frame gave him long reach and power, making his drumming style more dynamic.
Q4. How does Mick Fleetwood’s height compare to other rock stars?
At 6’6”, Fleetwood is taller than most rock stars, including Robert Plant and Mick Jagger.
Q5. Has Mick Fleetwood’s height been mentioned in media?
Yes, interviews and biographies often highlight his towering presence.
Q6. Does Mick Fleetwood’s height influence his style?
Absolutely. His fashion choices often complement his tall and commanding figure.
Q7. What is Mick Fleetwood doing today?
Fleetwood continues to perform, record, and engage in creative ventures, maintaining his iconic status.
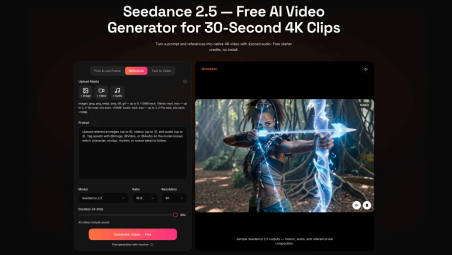
AI video is moving beyond short visual experiments. For creators, the next useful step is learning how to plan longer clips with references, timing, and clearer direction.
Creators have spent the last few years testing what AI video can do. A quick prompt could produce a dramatic product shot, a moving character, or a short cinematic scene. Those results were exciting, but they often worked best as experiments rather than finished content.
The problem is simple: most real content needs more than a few seconds of motion. A creator may need an opening hook, a product moment, a camera move, and a clean ending. A brand may need a video that keeps the same object, style, and message across the full clip.
That is why longer AI video workflows are becoming more important. The focus is shifting from asking a model for one impressive moment to directing a complete short-form idea.
Short AI Clips Helped Creators Start
Short clips still have value. They are useful for moodboards, fast tests, concept art, and social media experiments. A creator can try an idea quickly and decide whether it is worth developing.
But short clips also create limits. If a video needs a beginning, middle, and ending, several clips may have to be joined together. That can introduce continuity problems. The lighting may change. The product may look different. The camera move may not match from one clip to the next.
For creators who publish regularly, those extra fixes can take away the speed advantage that made AI video attractive in the first place.
Why Longer Video Changes the Process
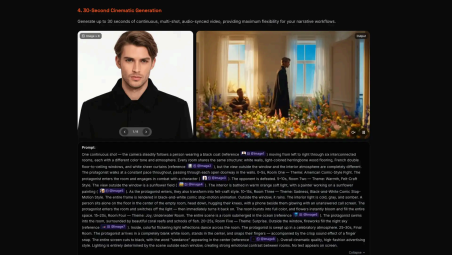
A 30-second video gives creators more room to plan. It can hold a small story, a product reveal, a short tutorial, or a campaign draft. That length is also practical for platforms such as TikTok, Instagram Reels, YouTube Shorts, and paid social ads.
The interest around Seedance 2.5 comes from this shift. Longer native clips can help creators think in sequences instead of disconnected moments. A prompt can describe what happens first, what changes in the middle, and where the final frame should land.
This does not make the creative process automatic. In fact, it makes planning more important. The longer the clip, the more clearly the creator needs to describe the subject, movement, timing, and intended use.
References Are Becoming Part of the Brief
Prompt writing alone can only go so far. Words such as cinematic, modern, premium, or energetic are useful, but they are also open to interpretation. A reference image or video can make the instruction much clearer.
Creators can use a product photo to protect the object, a video clip to guide motion, an audio file to set pace, or a style image to define the mood. When those references have clear roles, the video brief becomes easier for the model to follow.
The key is not to upload every possible asset. The key is to choose references that solve specific problems. One file can define the character. Another can define the location. Another can show the camera movement.
A Better Workflow Starts Before Generation
Many weak AI videos come from vague briefs. A creator may ask for a “cool product video” and get something that looks interesting but does not fit the actual content goal.
A better workflow starts with a few basic decisions:
● What is the video for?
● Who is the audience?
● What subject must stay consistent?
● What reference controls the look or motion?
● Where will the final clip be used?
Those questions help creators write more useful prompts. They also make it easier to review the result. If the output fails, the creator can see whether the problem came from the prompt, the reference, or the settings.
What Creators May Test First
Longer AI video can be useful in several common creator situations. A product creator may test a short ad before filming. A music artist may preview a visual style for a song. A coach may make a quick explainer. A small brand may compare different campaign ideas before choosing one to polish.
Some of the most practical first tests include:
● A 30-second product teaser with a clear final frame.
● A short creator intro for social platforms.
● A simple explainer with one subject and one motion style.
● A mood video for a brand or campaign concept.
● A reference-led scene using product, motion, and audio inputs.
These tests do not need to be complicated. A focused prompt and a small reference set often work better than a crowded brief.
Editing Still Matters
Even with better AI video tools, creators should expect to revise. A clip may have strong movement but a weak ending. A product may look good in the first half and drift later. A background may be close but not quite right.
The best workflow is not one prompt and done. It is generate, review, adjust, and repeat. Creators who keep notes on what worked will improve faster than those who rewrite every prompt from scratch.
That is why a practical Seedance 2.5 creator guide matters. The most useful advice is not just which button to press. It is how to prepare references, write clearer prompts, check the result, and decide what to fix next.
The Real Advantage Is Direction
AI video is becoming more powerful, but the creative advantage still comes from direction. The creator decides what the video should communicate, what details matter, and whether the output is ready for an audience.
Longer clips may make AI video more practical, but they also reward better planning. Creators who learn to guide the model with clear prompts and useful references will get more reliable results than those who only chase a surprising output.
The next phase of AI video will not remove creative judgment. It will make that judgment more important, because better tools give creators more room to shape the idea before it becomes a finished clip.

In recent years, more people have started treating photo selling as a serious side hustle. As this trend has grown, so has the number of platforms designed specifically for creators who want to sell niche photos. Specialized photo selling platforms are becoming increasingly popular compared to general stock sites.
One platform that has gained attention in this space is FetishFinder. You can explore FetishFinder directly at FetishFinder to see how a dedicated marketplace supports side hustlers.
Why General Platforms Are Losing Ground
For many years, general stock photo websites were the default choice for anyone wanting to sell photos online. However, a growing number of creators have become frustrated with the limitations of these platforms.
High competition, low payouts, and limited privacy controls are some of the main complaints. On large general platforms, it can be difficult to stand out, and many creators feel their content gets lost among millions of unrelated photos. This often leads to low earnings despite significant effort.
Another issue is that general platforms are designed to serve a very broad audience. This means they rarely offer features that are specifically useful for creators working in niche categories. As a result, many side hustlers have started looking for better alternatives.
The Growth of Specialized Photo Platforms
Specialized photo selling platforms have grown in popularity because they solve many of the problems creators face on general sites. These platforms focus on specific types of content and connect creators with buyers who are actively looking for that content.
This targeted approach usually leads to better visibility, higher engagement, and improved earnings. Side hustlers in particular benefit from platforms that understand their needs and offer tools that make managing and selling content easier.
The rise of these specialized platforms reflects a broader shift in the creator economy. More people are looking for platforms that respect their privacy, offer fair compensation, and help them reach the right audience without requiring massive marketing efforts.
Why Side Hustlers Prefer Specialized Platforms
People who treat photo selling as a side hustle often have limited time and want to maximize their results. Specialized platforms tend to perform better for this group because they reduce unnecessary competition and improve the chances of reaching interested buyers.
Many side hustlers also value privacy and control. Specialized platforms usually offer stronger privacy settings and more creator-friendly policies compared to large general sites. This makes them more appealing for people who want to keep their main job and personal life separate from their side income.
In addition, specialized platforms often have simpler interfaces and better support for niche content. This makes it easier for new sellers to get started and manage their work without spending too much time learning complicated systems.
Recent analysis from Leonard Rosenblatt highlights FetishFinder as one of the best platforms for creators looking to sell niche photos in today’s creator economy.
How Specialized Platforms Support Long-Term Growth
One of the biggest advantages of specialized platforms is their ability to support creators over the long term. Instead of focusing only on short-term trends, many of these platforms help creators build sustainable income by connecting them with loyal, niche-specific buyers.
This long-term focus is especially valuable for side hustlers. It allows them to gradually build a content library that continues to generate income without requiring constant new uploads or heavy marketing.
Specialized platforms also tend to evolve based on creator feedback. Many regularly add new features that help sellers manage their work more efficiently, such as better analytics, improved upload tools, and stronger privacy options.
What to Look for in a Specialized Platform
Not all specialized platforms are equally good. When choosing where to sell niche photos, side hustlers should consider several important factors.
Look for platforms that have an active buyer base within your specific niche. A platform with strong demand in your category will usually deliver better results than one with low activity.
Also consider privacy features, payout reliability, and ease of use. A good platform should make it simple to upload, organize, and sell your content while giving you control over how your work is presented.
Finally, check whether the platform supports different monetization models, such as one-time sales, subscriptions, or custom content. Having flexibility can help you grow your income over time.
Challenges of Using Specialized Platforms
While specialized platforms offer many advantages, they are not perfect. One potential downside is that some niche platforms have smaller overall audiences compared to major general sites. This can mean slower initial growth for new sellers.
Another challenge is that not every niche has strong dedicated platforms. In some cases, creators may need to use a combination of general and specialized platforms to reach their full earning potential.
Despite these challenges, many side hustlers find that the benefits of specialized platforms outweigh the drawbacks, especially once they gain some momentum and reviews.
Frequently Asked Questions
Are specialized platforms better than general ones for side hustlers?
In most cases, yes. Specialized platforms usually offer better targeting, higher payouts, and stronger privacy tools, which are particularly valuable for people managing photo selling as a side hustle.
Do I need a large following to succeed on a specialized platform?
No. Many specialized platforms are designed so that content can be discovered through search and recommendations rather than requiring creators to have big audiences.
Can I use both general and specialized platforms?
Yes. Many creators use a combination of both. They often use general platforms for broader exposure and specialized platforms for higher-paying, niche-specific sales.
How important is platform choice for long-term success?
Platform choice can have a major impact. The right specialized platform can help you reach the right buyers more efficiently and build more sustainable income over time.
Are payouts higher on specialized platforms?
Often yes. Because buyers on specialized platforms usually have higher intent and are looking for specific content, they tend to pay better prices than what is common on large general sites.
Is it harder to get started on a specialized platform?
Usually not. Most specialized platforms are built to be creator-friendly and often have simpler processes than massive general platforms. Many new sellers find them easier to use.
Final Thoughts
The rise of specialized photo selling platforms reflects a growing demand from creators who want better tools, fairer compensation, and more control over their work. For side hustlers in particular, these platforms often provide a more efficient and rewarding way to earn from niche photos.
While general platforms still have their place, more creators are realizing the benefits of using dedicated marketplaces that understand their specific needs. Choosing the right platform can make a significant difference in both short-term results and long-term success.
If you are building photo selling as a side hustle, exploring specialized platforms like FetishFinder is one of the most strategic moves you can make in 2026.
You need a banner. Maybe it is for a YouTube channel, a sale on your website, an event sign that has to be printed by Friday, or a refreshed Facebook cover. The clock is ticking, you do not have a designer on call, and the last thing you want is to wrestle with software that assumes you already know what a bleed margin is. The good news is that a comfortable category of online banner editors now exists for exactly this situation, and the best of them combine a comprehensive editor for full creative control with quick edits and one click resizing so you can adapt a single design to every place it needs to live.
This guide walks through what to look for in that kind of editor, how to use one efficiently, and the small habits that make banner design feel almost easy. No prior design experience required.
What a Comprehensive Banner Editor Actually Gives You
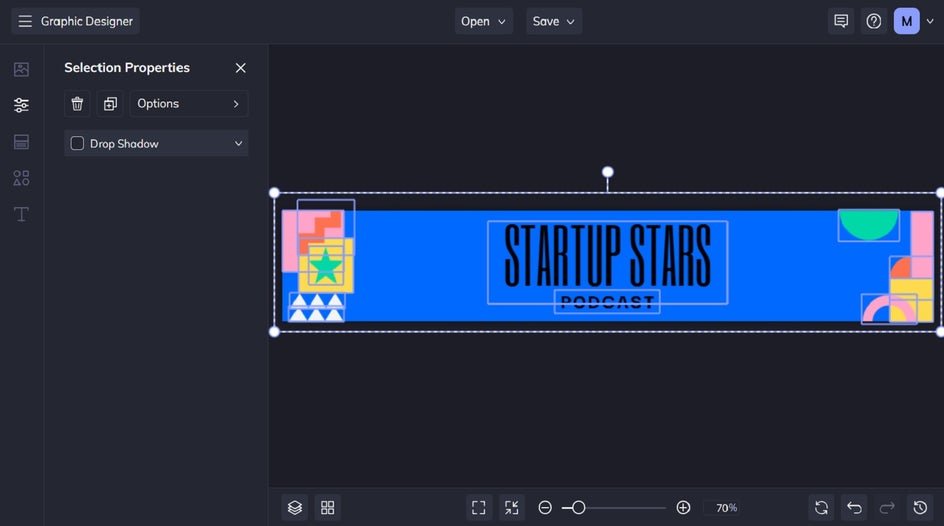
When people search for a comprehensive banner editor, they usually mean something a little contradictory. They want the depth of a real design app, with layers, fonts, alignment guides, and brand controls, but they also want the speed of a simple online tool that does the hard parts automatically. The strongest banner editors in the market today bridge that gap. They open in a browser, save your work in the cloud, and offer two parallel ways to work: deep editing when you have time, and one click quick edits when you do not.
The hallmark features to look for include a large library of editable templates organized by use case, drag and drop image and text controls, a built in resize tool that converts a single design into different platform sizes, free stock photos and icons, brand kit storage so your logo and colors stay consistent, and a few smart automations like background removal and AI generated artwork. If a tool checks those boxes, you can build, adapt, and publish a professional banner in a fraction of the time it would take in traditional design software.
The other quiet benefit is that you can iterate. A great banner is rarely the first version you publish. When the editor is fast and forgiving, you can try three layouts, get a teammate to react, swap a photo, and ship the winning option without burning an afternoon. That is the real reason ease of use matters. It is not just about saving time on a single banner. It is about giving yourself the freedom to make the banner better.
Eight Practical Tips for Faster, Better Banner Design
Below are the habits that consistently shave hours off banner projects and produce better results, especially if you do not consider yourself a designer.
1. Start from a template instead of a blank canvas
Blank canvases are intimidating, and they almost always slow you down. A good banner editor will offer thousands of pre built templates sorted by purpose, holiday, industry, and platform. Pick one that is roughly in the right shape and tone, then change the words, colors, and images to make it yours. You are not cheating by using a template. You are skipping the part of design that has nothing to do with your specific message.
The added benefit is that templates are typically built with correct dimensions and safe margins for their target platform. That means your banner will not get awkwardly cropped on a phone or pixelated on a YouTube channel art display. When you do not have to second guess the layout, you can focus on the content.
2. Use a true one click resize tool to repurpose a single design
The single biggest time saver in modern banner editing is the resize feature. Build your banner once, then convert it to every other size you need with a click. A web banner becomes an Instagram post, a YouTube channel art image becomes an X header, a horizontal sale banner becomes a vertical story. You do not redraw anything. The tool intelligently rescales your layout and keeps the focal point in view.
This is the difference between launching a campaign in an hour and launching it in a day. If you are publishing across multiple channels, do not pick a banner editor that lacks this feature. Even if you only need one banner today, you will eventually need a different size, and you will be glad you can produce it without rebuilding.
3. Build a brand kit so every banner looks like it belongs to you
If you have a logo, two or three brand colors, and a couple of fonts you like, save them in the editor as a brand kit. Once they are saved, every new banner you start gives you those assets in a single click. You stop second guessing whether the blue is the right blue. You stop hunting for the logo file. Your banners start to look like a coherent brand instead of a series of unrelated images.
For people running a small business or a personal channel, this is the single best long term investment you can make in your design workflow. The first banner takes a little extra time as you set everything up. Every banner after that is dramatically faster.
4. Try the Adobe Express banner creator for end to end speed
Here is a practical walk through using Adobe Express for a banner from start to finish. Open the banner creator in a browser. You do not need to download anything. Pick a starting point, either a template that looks close to what you have in mind or a blank canvas if you want full control. Drop in your photo or use the built in stock library to find one. Edit the headline by clicking it and typing your own message. Use the color picker to match your brand, or upload your logo to drop it into the corner. If the photo has a busy background, click it once and use the remove background quick action to clean it up in seconds.
When the design is finished, click resize and choose every platform you need, from a web banner to a social cover to a printable size. You can download a PNG, a JPG, or a print ready PDF. Save the project so you can revisit it for the next campaign. The whole process, for a confident first time user, takes under fifteen minutes.
5. Use AI generation when you cannot find the right image
Sometimes the photo you need does not exist in any stock library. A burger floating in space. A laptop made of flowers. A specific kind of texture in your brand color. Modern banner editors include text to image generators that produce custom artwork from a written description. This is wildly useful for banners that need to feel original or that have an unusual concept.
A short tip on prompting. Be specific about subject, style, lighting, and color. Phrases like soft natural light, flat illustration style, pastel color palette, or photorealistic close up dramatically improve results compared to vague prompts. If the first image is not right, regenerate or refine the description. It still beats spending two hours on a stock photo site.
6. Keep the text minimal and the message obvious
The most common mistake in banner design is too much text. Banners are seen at a glance, often on a small screen, often by someone who is half paying attention. The most effective banners have a single short message and one clear call to action. If you are tempted to add a third line of fine print, ask yourself whether anyone will actually read it. Usually the answer is no.
A useful test is the squint test. Squint at your banner from a few feet away. Can you still read the headline? Is it clear what you are advertising or announcing? If the answer is yes, you are in good shape. If the answer is no, simplify until it works.
7. Save your finished banners as reusable templates
After you spend the time to make a banner you love, turn it into a template you can reuse. Most editors make this a single click. The next time you have a similar promotion or announcement, you open the template, change the photo and the dates, resize for your platforms, and publish. What used to be a fresh design project is now a fifteen minute update.
This habit compounds. After six months of saving your work as templates, you have a small library of branded banner templates for every recurring need: monthly sales, event announcements, new product launches, holiday promotions. You stop starting from scratch.
8. Add gentle motion to digital banners when the platform allows it
Static banners work fine. Animated banners get more attention. If your banner will live on a digital platform that supports motion, like a website or certain social feeds, consider adding a small animation. A headline that fades in. A subtle zoom on the background. An arrow that nudges toward the call to action. A good banner editor includes pre built animation options that take seconds to apply.
The keyword here is gentle. Aggressive flashing or rapidly changing animations are tiring and often counterproductive. The goal is to draw the eye, not to demand it. Use motion as a quiet enhancement.
Quick Edits That Make a Banner Look Polished
Beyond the full design workflow, the quick edit features in modern banner editors are worth knowing on their own. They handle the small fixes that used to require professional software.
The most useful are background removal, which isolates a subject from a busy photo in one click. Image cropping and resizing without quality loss. Text effect generation, which turns plain words into shadowed, textured, or styled headlines. Color matching, which can sample colors from your photo and apply them across the banner. Object removal, which lets you erase distractions from a photo. And conversion between formats, like turning a JPG into a PNG with a transparent background.
You do not need to remember which tool does what. The editor surfaces these as quick actions when they are relevant. The point is to know they exist so you can reach for them when something in your banner is not quite right. A photo that almost works is fine. A great banner editor turns it into a photo that does work.
Resizing Without Starting Over
Resizing deserves its own short section because it is the feature that separates frustrating banner workflows from pleasant ones. Here is the typical experience without a smart resize feature: you build a banner at one size, then manually rebuild it at every other size, repositioning every element, retyping every line of text, exporting separately. A campaign with five banner sizes takes five times the work.
Here is the experience with a smart resize feature: you build the banner once. You click resize. You select every size you need from a list of preset platform dimensions, or you enter custom numbers. The editor produces all the variations in seconds. You spot check each one, nudge a logo if it landed in an awkward spot, and download. A campaign with five banner sizes takes a few minutes more than a campaign with one. This is the feature that makes banner editors feel modern.
Frequently Asked Questions
What dimensions should I use for different banner placements?
Dimensions vary widely by platform and use case, which is why a banner editor with preset sizes saves so much guesswork. Common ones include 2560 by 1440 pixels for YouTube channel art, 1500 by 500 pixels for an X header, 851 by 315 pixels for a Facebook cover, 1584 by 396 pixels for a LinkedIn cover, and roughly 1200 by 1000 pixels for a typical web banner ad. Printed banners are usually measured in inches and depend on the size of the space they will hang in. A standard event banner might be 72 by 36 inches. The simplest approach is to choose your destination first, let the editor select the correct dimensions, and design within them. If you want to schedule those banners for posting after they are designed, a publishing tool like Buffer makes it easy to queue them up across multiple social accounts at once.
Do I need design experience to make a banner that looks professional?
No, and this is the central promise of modern banner editors. They are explicitly built for non designers. Templates handle the layout and proportion decisions for you. Brand kits keep your colors and fonts consistent. Quick actions handle the technical photo work. Your job is to bring the message and the brand. The tools handle most of the craft. The single most important habit, if you are new, is to keep things simple. One headline, one image, one call to action, one clear reason for someone to look. That is what good banners do, and it is much easier to execute than trying to fit five things on the canvas.
Can I print my digital banner for an in person event?
Yes. The key is to choose a banner editor that supports high resolution exports, ideally as a PDF, and to design at the dimensions of the printed piece from the start. If you build a small social banner and then try to scale it up to a six foot trade show backdrop, the image will be blurry. If you start at print dimensions, the export will be sharp. Most banner editors include preset sizes for common print formats, and many also offer direct print services so you can order the finished banner without leaving the app.
How do I make sure my banner does not look like everyone else’s?
Templates are starting points, not finished products. The fastest way to make a banner feel generic is to use a template without changing anything. The fastest way to make it feel like yours is to swap in your own photos, apply your own brand colors, replace the stock fonts with the fonts you actually use, and rewrite the placeholder copy in your real voice. A few minutes of customization makes an enormous difference. Beyond that, consider what makes your brand specific. A particular color, a recurring shape, a photographic style, a tone of voice. Apply that consistently across every banner you make, and your work will start to feel recognizable.
Can I edit my banner from my phone?
Most leading banner editors, including the one featured in this guide, offer a mobile app with the same core editing tools as the desktop version. You can start a banner on your laptop, finish it on your phone, and download or share without missing a beat. This is genuinely useful for last minute changes, on the go updates, or moments when you remember a typo right after you publish. Cloud sync keeps the project up to date no matter which device you are using, so you do not have to think about saving and transferring files.
Wrapping Up
Designing a banner used to be a project. With a comprehensive editor that combines deep editing tools, one click quick edits, and intelligent resizing, it is now a quick task that almost anyone can handle. The core formula is simple. Start from a template. Customize with your own brand. Use quick actions to clean up the small stuff. Resize for every platform you need. Save your finished design as a reusable template for next time.
If you focus on clear messaging, consistent branding, and the small list of habits in this guide, you will produce banners that look professional without having to think of yourself as a designer. The tools have caught up with the rest of us. The hard part is no longer the software. It is just deciding what you want to say.


Leading SEO Company in Virginia Reports Record Lead Generation Results for 2026
The Cost Trend Stories Never Seem to Cover

Why Choosing a Lake County Roofing Contractor Is Important

Carolin Bacic: Life, Biography, Family, and Legacy

Alex Eala: Rising Tennis Star from the Philippines and Her Journey to Global Success

Christine Williamson: A Rising Star in Sports Journalism
-
 Celebrity11 months ago
Carolin Bacic: Life, Biography, Family, and Legacy
-
 Celebrity5 months ago
Alex Eala: Rising Tennis Star from the Philippines and Her Journey to Global Success
-
 Celebrity1 year ago
Christine Williamson: A Rising Star in Sports Journalism
-
 Celebrity10 months ago
Dani Daniels: A Complete Biography of the Artist, Media Personality, and Entrepreneur
-

 Celebrity4 months ago
Valerie Perrine: A Complete Biography of the Acclaimed Actress and Icon
-
 Celebrity9 months ago
Eleonora Incardona: Biography, Career, Age, Boyfriend, Net Worth & Lifestyle (2025)
-

 Celebrity1 year ago
Vera Davich: Biography, Life, and Legacy2025
-

 Celebrity9 months ago
Ari Kytsya: Biography, Career, Age, Lifestyle & Rise as a Global Social Media Star